
6. Site Design
Ready to plant some trees? Not yet! A lot of planning goes into deciding where to put your trees to ensure the best yields and outcomes. In this step, you’ll create a site design that situates your trees skillfully into the landscape.
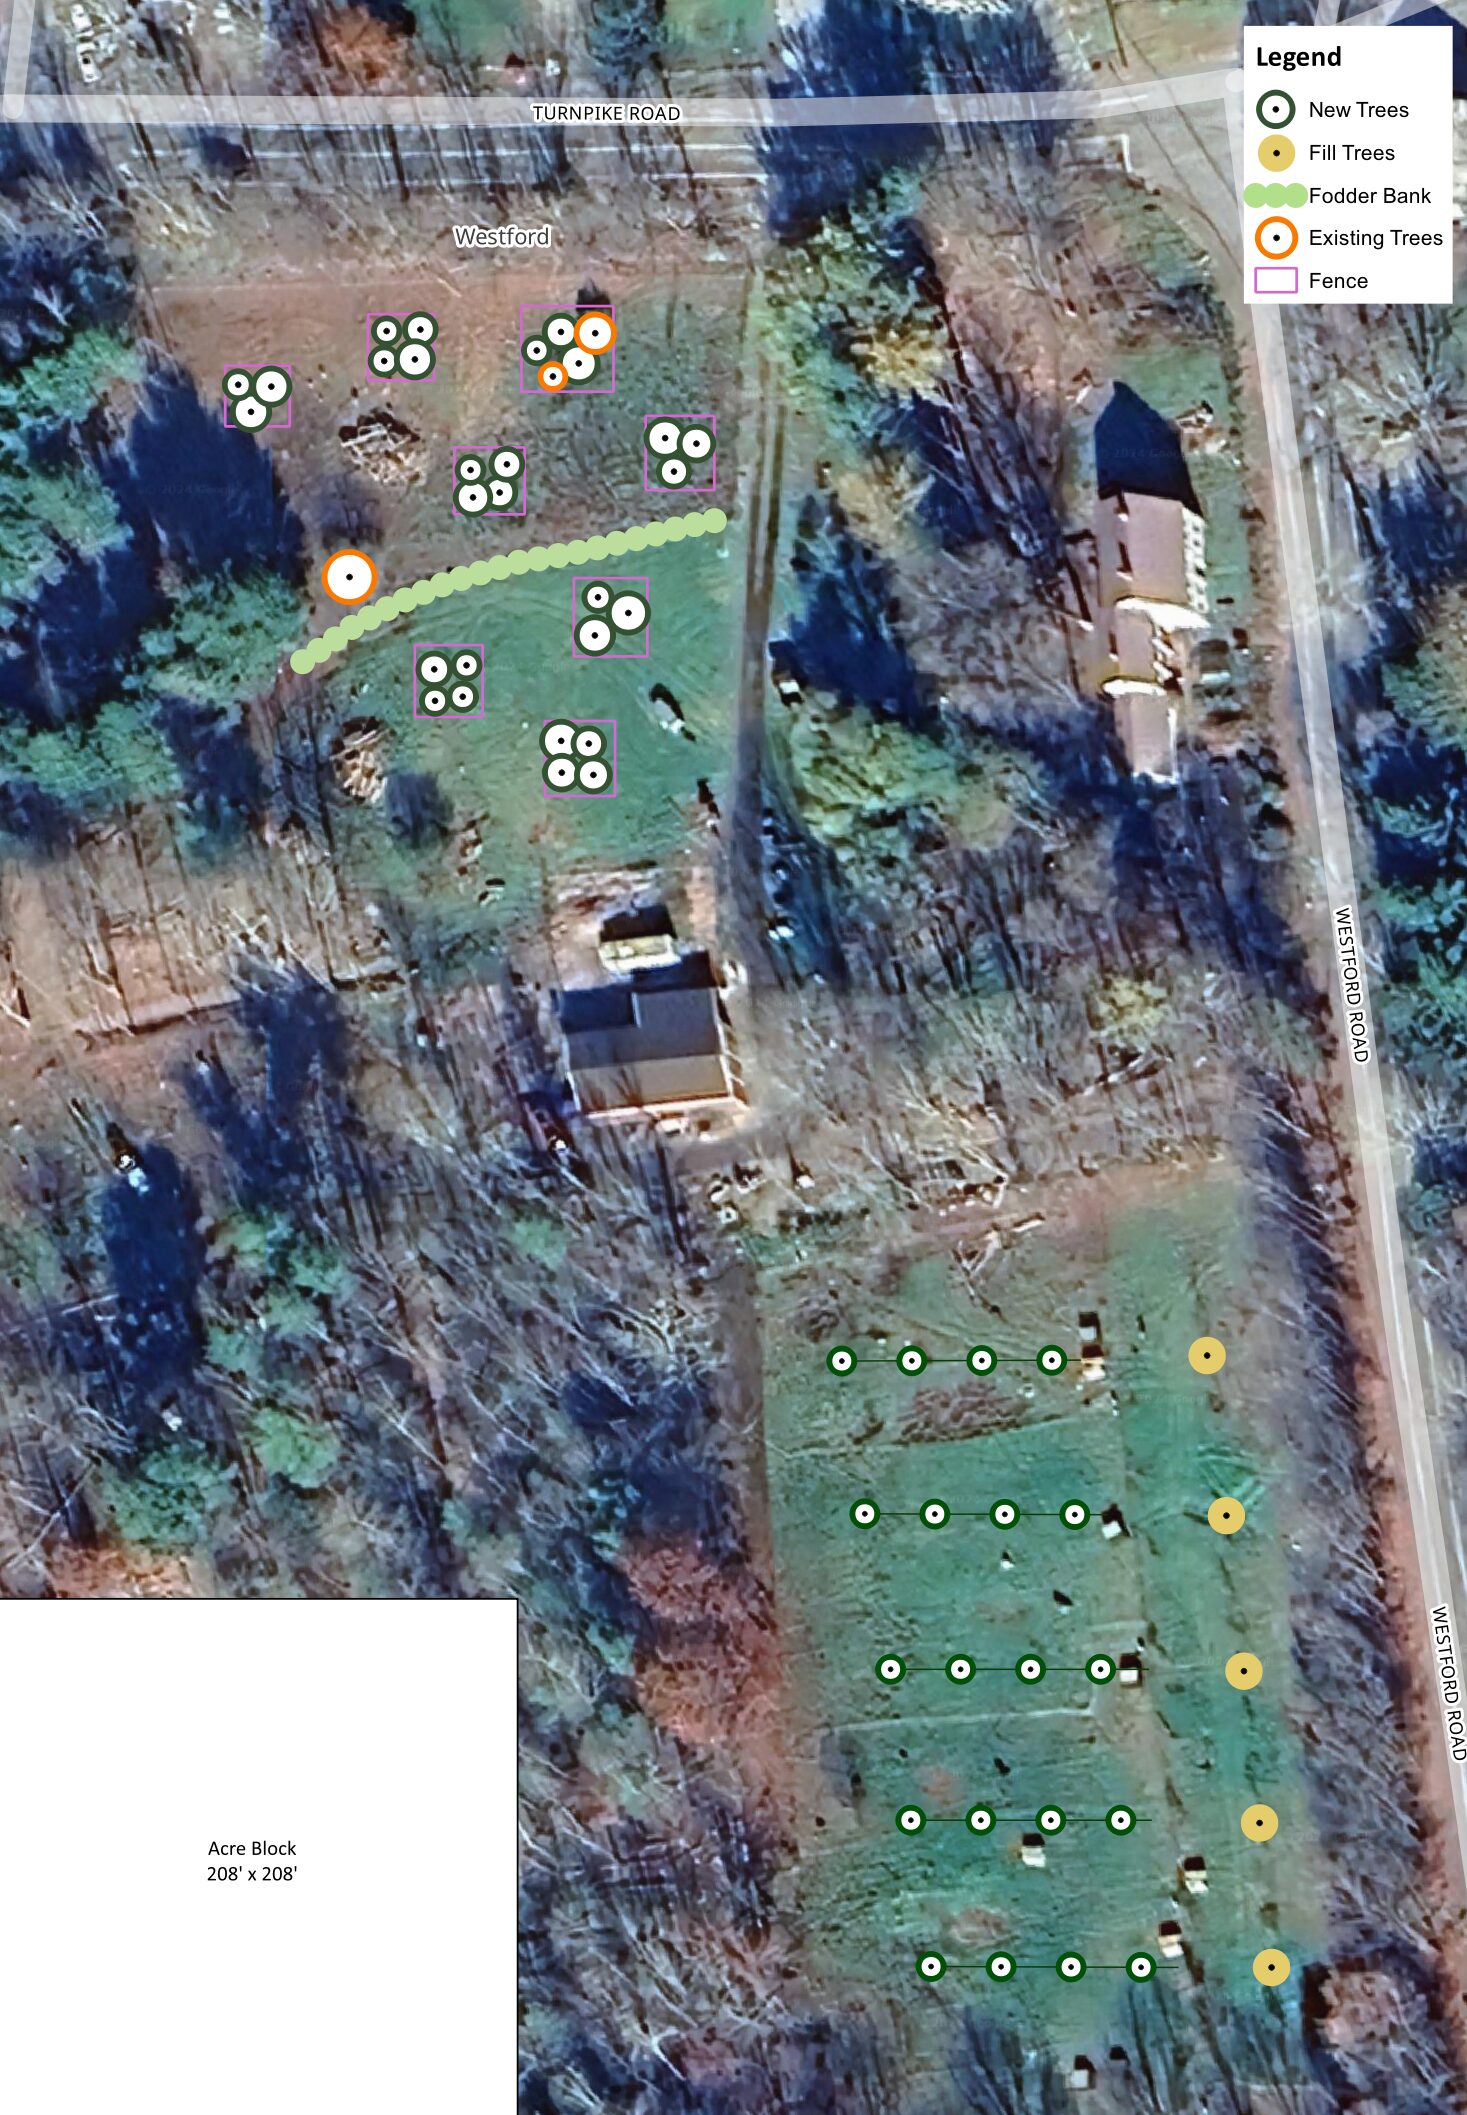
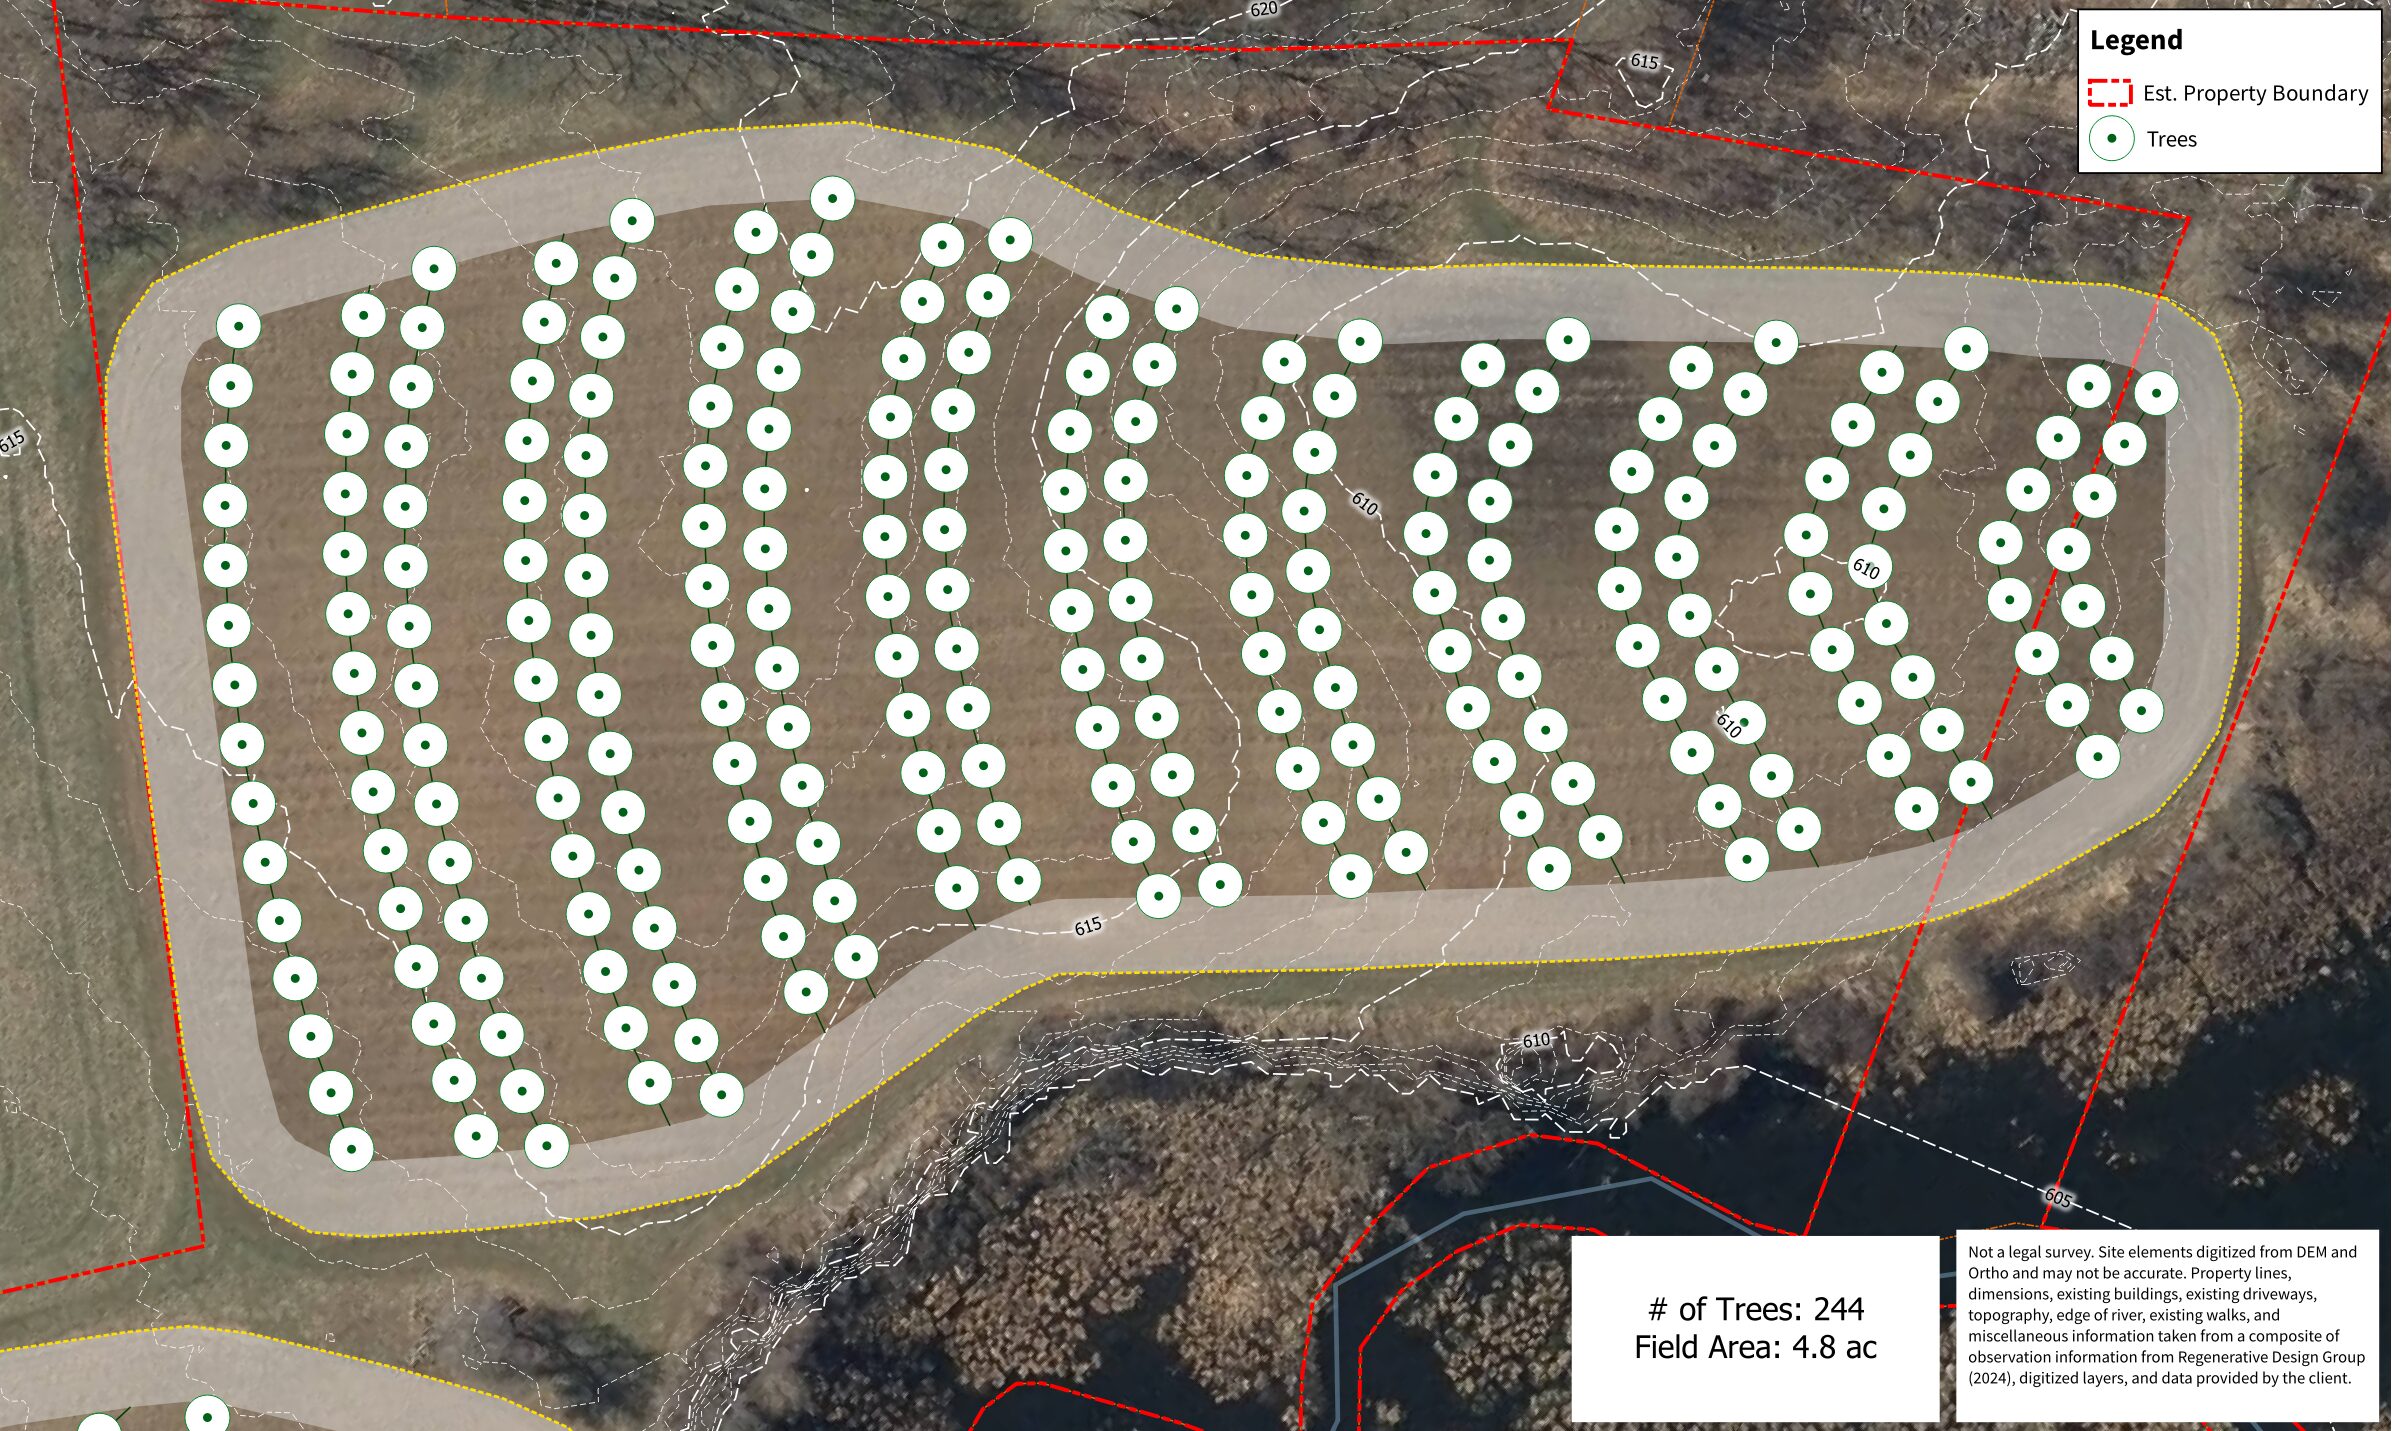
To design your planting plan, you will study your landscape using a topographical survey or recent aerial photo as a base map. You can find these for free using Google Earth or other GIS software tools. You can also glean important information using remote soil data from the NRCS Soil Survey website.
You’ll also need to take measurements of the field or area you will be working in and note important details such as slope, surface water, and any changes in soil types on your map. Be sure to consider the following key elements in your design to ensure that your future project performs as expected.

1. Topography


Topography is a significant characteristic to incorporate into your design, especially if you are working with any amount of slope. Rows should generally follow the contour lines of a slope to prevent erosion and help ensure that water is evenly distributed throughout a field. However, this may create unevenly spaced rows, which may present challenges for ongoing field maintenance, grazing, and/or harvesting. Identifying a keyline and planting parallel to it can help reduce inconsistencies while minimizing erosion and spreading water infiltration across a field or even bringing increased moisture to drier areas. Implementing earthworks to alter the topography of a site may also be worth exploring.
2. Aspect and Orientation
East- and north-facing slopes are often preferred for planting fruit trees because they are less susceptible to spring temperature volatility, which may cause early flowering before the last spring frost. For flatter fields, orienting rows east-west will provide more sunlight for alley crops than rows planted north-south. If you have the option, alley cropping may be best executed in rows oriented northwest-southeast for northern latitudes.
3. Access
Access is also a critical consideration in the planning phase. What types of access will you need in your field for future management, such as mowing, cultivating, pruning, and harvesting? Do some rows need to be spaced wider apart for vehicular access? If you are cultivating annual crops between trees, the alleys should be a multiple of your widest equipment.
Other key considerations when creating your field layout include the following:
- Will you need to turn large equipment (mowers, tractors, harvesters) around at the ends of your rows? (Also known as “headspace”)
- Do you need to fence your field? Where will your gates be?
- Are there recommendations for including buffer space between forest and field edges?
4. Patterns
There are many different spatial patterns you can use in your layout depending on your goals:
 5. Spacing
 5. Spacing
Perennial crops have different mature sizes and spacing requirements. In a block or grid planting, spacing between rows will largely depend upon goals and management practices (e.g., silvopasture vs. alley cropping) but should always be greater than spacing between plants. Measure your rows and determine how many trees you can fit in each row, whether you are planting a 20’ hedge of raspberries or a 10-acre field of large nut trees. The following chart can be a guide, but some characteristics and space requirements will still vary by site.
| Crop | Height (at maturity) | Width (at maturity) | In-row spacing |
| Apple, semi-dwarf | 12-15’ | 10’ | 15’ |
| Apple, standard | 20-40’ | 20’ | 25’ |
| Chestnut | 30-50’ | 15’ | 30’ |
| Hickory | 30-50’ | 25’ | 30’ |
| Hazelnut | 10-15’ | 6-8’ | 4-6’ |
| Black Locust | 30-50’ | 25’ | 30’ |
| Walnut | 50-75’ | 25’ | 30’ |
| Elderberry | 6’ | 6’ | 8’ |
| Currant | 4’ | 4’ | 6’ |
| Persimmon | 30-50’ | 15’ | 15’ |
| Paw Paw | 15’ | 15’ | 15’ |
Trees per acre (43,560sqft) based on the spacing between trees in a grid pattern:
| 3 | 5 | 10 | 15 | 20 | 25 | 30 | 40 | 50 | 60 | 70 | 80 | 90 | 100 | |
|---|---|---|---|---|---|---|---|---|---|---|---|---|---|---|
| 3 | 4,840 | 2,904 | 1,452 | 968 | 726 | |||||||||
| 5 | 2,904 | 1,742 | 871 | 581 | 436 | |||||||||
| 10 | 1,752 | 871 | 436 | 290 | 218 | 174 | 145 | 109 | 87 | 73 | 62 | 55 | 48 | 43 |
| 15 | 968 | 581 | 290 | 194 | 145 | 116 | 97 | 73 | 58 | 49 | 41 | 36 | 32 | 29 |
| 20 | 726 | 436 | 218 | 145 | 109 | 87 | 73 | 54 | 43 | 36 | 31 | 27 | 24 | 21 |
| 25 | 174 | 116 | 87 | 70 | 58 | 43 | 35 | 29 | 25 | 22 | 19 | 17 | ||
| 30 | 145 | 97 | 73 | 58 | 48 | 36 | 29 | 24 | 21 | 18 | 16 | 15 | ||
| 40 | 109 | 73 | 54 | 43 | 36 | 27 | 22 | 18 | 16 | 14 | 12 | 11 | ||
| 50 | 87 | 58 | 43 | 35 | 29 | 22 | 17 | 15 | 13 | 11 | 10 | 9 | ||
| 60 | 73 | 49 | 36 | 29 | 24 | 18 | 15 | 12 | 10 | 9 | 8 | 7 |
6. Time

Because agroforestry plantings are long-lived, it is critical to consider how your planting will change over time. Proper spacing in-row and between-row should account for how tall the tree/shrub will get in 5-10-20+ years. The impact of shade on practices like alley cropping, hedgerows, and riparian buffers can be significant. Some growers intentionally crowd plantings and thin or cut out underperforming trees after 10 or more years. Other growers will prioritize select genetics and plant for final spacing.
Consider also how you can use time to your advantage with successional planting. For example, when trees are still immature in the early years, growing annual row crops or integrating poultry may allow you to generate some early income. As the trees get more established, your field may better support more shade-tolerant crops such as brassicas, root crops, leafy greens, or hay. Some understory species may even prefer shade in the early years such as paw paw and currants. How you manage your perennials over time will also impact your system, such as when coppicing or establishing spring ephemerals. Harvesting more than one crop from the same area in the same year is known as overyield, which can significantly increase your yields and economic returns over time.
Software Design Tools
When you are ready, make a scale drawing of your desired layout. Bigger is better! Print out your base maps as large as possible, and use tracing paper to overlay different design ideas. Try generating quick, rough layouts or sketching planting blocks before getting mired in the details. Paper and pencil are indispensable tools, but digital software programs can also generate layout plans. Google Earth Pro can generate aerial maps that include layers with polygons and points, allowing you to measure the distances between them. SketchUp is a free design program that can create layouts to scale to help determine in-field spacing and the number of trees needed. For $85/month you can also design in Overyield, a unique agroforestry software program created by Propagate Ag to model plantings and project economic returns.
Pro tip: Select a fixed point on your map, such as an existing tree or building corner, and plan your layout from there. This will help when you go to put your plan in the ground!
For larger and more complex designs, or if a DIY layout is not your strong suit, you can hire a professional designer or agroforestry consultant to develop a GIS-compatible layout that can be implemented with GPS-enabled devices. Though more expensive upfront, it can save you money in the long run, helping you avoid the pitfalls of poor layout and resources spent on materials and establishment.
Examples of different agroforestry site designs:


Related Posts

Comments (0)